- Qwen2.5 VL fine-tuning depends heavily on accurate image-to-annotation alignment. Small filename or path errors can result in training that runs but learns very little.
- Use a three-role format, system, user, and assistant, to improve instruction consistency and structured JSON extraction.
- LoRA reduces the number of trainable parameters, while QLoRA loads the base model in 4-bit precision to lower VRAM usage.
- Carefully mask padding and image tokens in the training labels. Incorrect masking can silently distort the loss calculation.
- Keep training and evaluation collate functions separate because evaluation requires generated responses rather than training labels.
- Use validation metrics, early stopping, gradient accumulation, and regular checkpoints to detect poor training runs and prevent progress loss.
- After fine-tuning, compare the base and fine-tuned models against the required schema, not only whether individual values were extracted correctly.
- The fine-tuned model in this example produced more consistent field names, JSON structure, and document-extraction output than the original model.
Fine-tuning a vision-language model usually sounds simple on paper, prepare data, load the model, train, and infer. In practice, it’s where most teams lose days to GPU crashes, silent data issues, and outputs that almost work.
We ran into those exact problems while adapting Qwen2.5 VL for structured document extraction. This guide is the distilled version of what worked, what broke, and what we’d do differently if we started again.
We’ll break down the process step by step, explaining how to prepare your data, configure the model, and train it efficiently. Whether you’re new to fine-tuning or have experience with it, this guide will help you understand each part of the process and make it easier for you to apply the Qwen2.5 VL model to your own projects. Let’s get started!
Environment Setup
Qwen2.5 VL is forgiving in many places, VRAM is not one of them. In our experiments, anything below 18GB VRAM led to frequent OOM errors once image grids and LoRA adapters were active, even with aggressive batching. Then we need to create a Python environment and install all required dependencies. Each package serves a specific purpose. If you’re still weighing frameworks for your stack, this comparison of PyTorch vs TensorFlow will help you choose confidently.
python -m venv venv
source venv/bin/activate

pip install -q git+https://github.com/huggingface/transformers accelerate peft bitsandbytes qwen-vl-utils[decord]==0.0.8 lightning nltk
Data Preparation
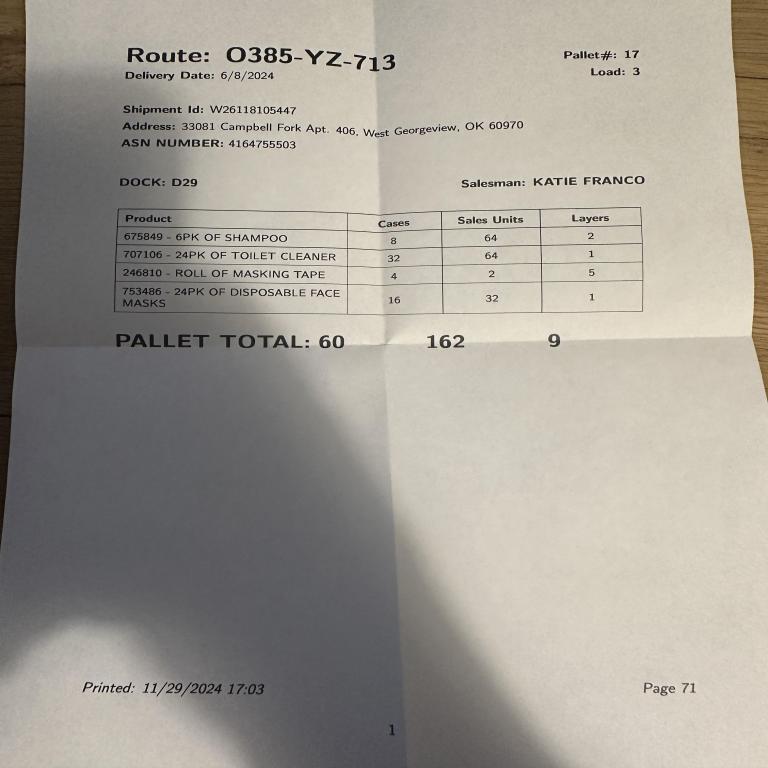
Data structure is where most fine-tuning attempts silently fail. Qwen2.5 VL expects image–text alignment to be exact, and even small mismatches between filenames, annotations, and image paths can lead to training that “runs fine” but learns nothing. We need to organise our data in a way that makes it easy to load and process both images and their corresponding text annotations.
The data directory should be in the following format:
Data/
├── train/
│   ├── annotations.jsonl
│   ├── image_1.jpg
│   ├── image_2.jpg
│   ├── ...
│   ├── image_n.jpg
├── val/
│   ├── annotations.jsonl
│   ├── image1.jpg
│   ├── image2.jpg
│   ├── ...
│   ├── image_n.jpg
Example annotation format
Image
Annotation
{
  "image": "image_1.jpg",
  "prefix": "extract data in JSON format",
  "suffix": {
    "route": "O385-YZ-713",
    "pallet_number": "17",
    "delivery_date": "6/8/2024",
    "load": "3",
    "dock": "D29",
    "shipment_id": "W26118105447",
    "destination": "33081 Campbell Fork Apt. 406, West Georgeview, OK 60970",
    "asn_number": "4164755503",
    "salesman": "KATIE FRANCO",
    "products": [
      {
        "description": "675849 - 6PK OF SHAMPOO",
        "cases": "8",
        "sales_units": "64",
        "layers": "2"
      },
      {
        "description": "707106 - 24PK OF TOILET CLEANER",
        "cases": "32",
        "sales_units": "64",
        "layers": "1"
      },
      {
        "description": "246810 - ROLL OF MASKING TAPE",
        "cases": "4",
        "sales_units": "2",
        "layers": "5"
      },
      {
        "description": "753486 - 24PK OF DISPOSABLE FACE MASKS",
        "cases": "16",
        "sales_units": "32",
        "layers": "1"
      }
    ],
    "total_cases": "60",
    "total_units": "162",
    "total_layers": "9",
    "printed_date": "11/29/2024 17:03",
    "page_number": "71"
  }
}
We treat the prefix as a system-level instruction, not a user query. This matters. During early experiments, framing this as a user message caused inconsistent outputs, especially for nested JSON fields. Keeping extraction instructions at the system level significantly stabilised responses.
Dataset formatting
The format_data function structures the data into a three-turn chat format (system → user → assistant). We tested simpler layouts such as single-turn and user-only prompts, but they led to inconsistent JSON structures and unstable field extraction. This explicit role separation consistently produced better grounding between the input image and the extracted fields during training.
The JSONLDataset class handles data loading and processing by reading JSONL annotations, loading corresponding images, and formatting data into the required conversation structure.
import os
import json
import random
from PIL import Image
from torch.utils.data import Dataset

def format_data(image_directory_path, entry):
    return [
        {
            "role": "system",
            "content": [{"type": "text", "text": SYSTEM_MESSAGE}],
        },
        {
            "role": "user",
            "content": [
                {
                    "type": "image",
                    "image": image_directory_path + "/" + entry["image"],
                },
                {
                    "type": "text",
                    "text": entry["prefix"],
                },
            ],
        },
        {
            "role": "assistant",
            "content": [{"type": "text", "text": entry["suffix"]}],
        },
    ]

class JSONLDataset(Dataset):
    def __init__(self, jsonl_file_path: str, image_directory_path: str):
        self.jsonl_file_path = jsonl_file_path
        self.image_directory_path = image_directory_path
        self.entries = self._load_entries()
    def _load_entries(self):
        entries = []
        with open(self.jsonl_file_path, 'r') as file:
            for line in file:
                data = json.loads(line)
                entries.append(data)
        return entries
    def __len__(self):
        return len(self.entries)
    def __getitem__(self, idx: int):
        if idx < 0 or idx >= len(self.entries):
            raise IndexError("Index out of range")
        entry = self.entries[idx]
        image_path = os.path.join(self.image_directory_path, entry['image'])
        image = Image.open(image_path)
        return image, entry, format_data(self.image_directory_path, entry)
Loading the dataset
train_dataset = JSONLDataset(
    jsonl_file_path=f"{dataset.location}/train/annotations.jsonl",
    image_directory_path=f"{dataset.location}/train",
)
valid_dataset = JSONLDataset(
    jsonl_file_path=f"{dataset.location}/valid/annotations.jsonl",
    image_directory_path=f"{dataset.location}/valid",
)
Model loading and Lora configuration
Next, we load the model and configure it for training.

Walk away with actionable insights on AI adoption.
Limited seats available!

Why LoRA?
We initially attempted full fine-tuning on the 3B model and quickly hit practical limits, unstable loss curves, longer warm-up times, and VRAM pressure that made experimentation painful. LoRA gave us a faster feedback loop, while QLoRA made it possible to iterate without upgrading hardware.
Why QLoRA?
QLoRA (Quantized LoRA) further reduces memory usage by quantizing the base model to 4 bits, while preserving performance. In VRAM-constrained workflows, teams also weigh Small language models when task scope allows, keeping latency low without oversizing the stack.
import torch
from peft import get_peft_model, LoraConfig
from transformers import BitsAndBytesConfig
from transformers import Qwen2_5_VLForConditionalGeneration, Qwen2_5_VLProcessor

MODEL_ID = "Qwen/Qwen2.5-VL-3B-Instruct"
DEVICE = torch.device("cuda" if torch.cuda.is_available() else "cpu")

USE_QLORA = True
lora_config = LoraConfig(
    lora_alpha=16,
    lora_dropout=0.05,
    r=8,
    bias="none",
    target_modules=["q_proj", "v_proj"],
    task_type="CAUSAL_LM",
)
if USE_QLORA:
    bnb_config = BitsAndBytesConfig(
        load_in_4bit=True,
        bnb_4bit_use_double_quant=True,
        bnb_4bit_quant_type="nf4",
        bnb_4bit_compute_type=torch.bfloat16
    )
model = Qwen2_5_VLForConditionalGeneration.from_pretrained(
    MODEL_ID,
    device_map="auto",
    quantization_config=bnb_config if USE_QLORA else None,
    torch_dtype=torch.bfloat16)
model = get_peft_model(model, lora_config)
model.print_trainable_parameters()

MIN_PIXELS = 256 * 28 * 28
MAX_PIXELS = 1280 * 28 * 28
processor = Qwen2_5_VLProcessor.from_pretrained(MODEL_ID, min_pixels=MIN_PIXELS, max_pixels=MAX_PIXELS)
Train collate function
Collate functions determine how images, text, padding, and special tokens are combined before being passed to the model, making them a critical part of multimodal training.
In practice, most training issues we encountered were not caused by the model itself but by subtle mistakes in the collate logic. The train_collate_fn explicitly applies chat templates, processes image inputs, constructs attention masks, and carefully masks padding and image tokens in the labels. This verbosity is intentional—small mistakes at this stage can silently corrupt loss computation without raising errors.
from qwen_vl_utils import process_vision_info

def train_collate_fn(batch):
    _, _, examples = zip(*batch)
    texts = [
        processor.apply_chat_template(example, tokenize=False)
        for example
        in examples
    ]
    image_inputs = [
        process_vision_info(example)[0]
        for example
        in examples
    ]
    model_inputs = processor(
        text=texts,
        images=image_inputs,
        return_tensors="pt",
        padding=True
    )
    labels = model_inputs["input_ids"].clone()
    # mask padding tokens in labels
    labels[labels == processor.tokenizer.pad_token_id] = -100
    if isinstance(processor, Qwen2_5_VLProcessor):
        image_tokens = [151652, 151653, 151655]
    else:
        image_tokens = [processor.tokenizer.convert_tokens_to_ids(processor.image_token)]
    # mask image token IDs in the labels
    for image_token_id in image_tokens:
        labels[labels == image_token_id] = -100
    input_ids = model_inputs["input_ids"]
    attention_mask = model_inputs["attention_mask"]
    pixel_values = model_inputs["pixel_values"]
    image_grid_thw = model_inputs["image_grid_thw"]
    return input_ids, attention_mask, pixel_values, image_grid_thw, labels
Evaluate collate function
The evaluation collate function is unique because it doesn't require labels, preserves target suffixes for comparison, and removes assistant responses, prompting the model to generate them.
def evaluation_collate_fn(batch):
    _, data, examples = zip(*batch)
    suffixes = [d["suffix"] for d in data]
    # drop the assistant portion so the model must generate it
    examples = [e[:2] for e in examples]
    texts = [
        processor.apply_chat_template(example, tokenize=False)
        for example
        in examples
    ]
    image_inputs = [
        process_vision_info(example)[0]
        for example
        in examples
    ]
    model_inputs = processor(
        text=texts,
        images=image_inputs,
        return_tensors="pt",
        padding=True
    )
    input_ids = model_inputs["input_ids"]
    attention_mask = model_inputs["attention_mask"]
    pixel_values = model_inputs["pixel_values"]
    image_grid_thw = model_inputs["image_grid_thw"]
    return input_ids, attention_mask, pixel_values, image_grid_thw, suffixes
Load the train and validate datasets
from torch.utils.data import DataLoader
BATCH_SIZE = 1
NUM_WORKERS = 0
train_loader = DataLoader(train_dataset, batch_size=BATCH_SIZE, collate_fn=train_collate_fn, num_workers=NUM_WORKERS, shuffle=True)
valid_loader = DataLoader(valid_dataset, batch_size=BATCH_SIZE, collate_fn=evaluation_collate_fn, num_workers=NUM_WORKERS)
Training setup with Lightning
Lightning offers an organized training code structure, automatic GPU optimization, easy logging and checkpointing, and simple validation implementation.
import lightning as L
from nltk import edit_distance
from torch.optim import AdamW
class Qwen2_5_Trainer(L.LightningModule):
    def __init__(self, config, processor, model):
        super().__init__()
        self.config = config
        self.processor = processor
        self.model = model
    def training_step(self, batch, batch_idx):
        input_ids, attention_mask, pixel_values, image_grid_thw, labels = batch
        outputs = self.model(
            input_ids=input_ids,
            attention_mask=attention_mask,
            pixel_values=pixel_values,
            image_grid_thw=image_grid_thw,
            labels=labels
        )
        loss = outputs.loss
        self.log("train_loss", loss, prog_bar=True, logger=True)
        return loss
    def validation_step(self, batch, batch_idx, dataset_idx=0):
        input_ids, attention_mask, pixel_values, image_grid_thw, suffixes = batch
        generated_ids = self.model.generate(
            input_ids=input_ids,
            attention_mask=attention_mask,
            pixel_values=pixel_values,
            image_grid_thw=image_grid_thw,
            max_new_tokens=1024
        )
        generated_ids_trimmed = [
            out_ids[len(in_ids) :]
            for in_ids, out_ids
            in zip(input_ids, generated_ids)]
        generated_suffixes = processor.batch_decode(
            generated_ids_trimmed,
            skip_special_tokens=True,
            clean_up_tokenization_spaces=False
        )
        scores = []
        for generated_suffix, suffix in zip(generated_suffixes, suffixes):
            score = edit_distance(generated_suffix, suffix)
            score = score / max(len(generated_suffix), len(suffix))
            scores.append(score)
            print("generated_suffix", generated_suffix)
            print("suffix", suffix)
            print("score", score)
        score = sum(scores) / len(scores)
        self.log("val_edit_distance", score, prog_bar=True, logger=True, batch_size=self.config.get("batch_size"))
        return scores
    def configure_optimizers(self):
        optimizer = AdamW(self.model.parameters(), lr=self.config.get("lr"))
        return optimizer
    def train_dataloader(self):
        return DataLoader(
            train_dataset,
            batch_size=self.config.get("batch_size"),
            collate_fn=train_collate_fn,
            shuffle=True,
            num_workers=10,
        )
    def val_dataloader(self):
        return DataLoader(
            valid_dataset,
            batch_size=self.config.get("batch_size"),
            collate_fn=evaluation_collate_fn,
            num_workers=10,
        )
Training configs
Each parameter serves a specific purpose: max_epochs defines total training iterations, batch_size is kept small due to model size, lr is optimized for LoRA, gradient_clip_val prevents exploding gradients, and accumulate_grad_batches simulates larger batch sizes.
config = {
    "max_epochs": 10,
    "batch_size": 1,
    "lr": 2e-4,
    "check_val_every_n_epoch": 2,
    "gradient_clip_val": 1.0,
    "accumulate_grad_batches": 8,
    "num_nodes": 1,
    "warmup_steps": 50,
    "result_path": "qwen2.5-3b-instruct-ft"
}
Checkpoint saving function
Saving checkpoints ensure training can resume if interrupted, preserves the best models, prevents progress loss, and facilitates deployment
from lightning.pytorch.callbacks import Callback
from lightning.pytorch.callbacks.early_stopping import EarlyStopping

early_stopping_callback = EarlyStopping(monitor="val_edit_distance", patience=3, verbose=False, mode="min")

class SaveCheckpoint(Callback):
    def __init__(self, result_path):
        self.result_path = result_path
        self.epoch = 0
    def on_train_epoch_end(self, trainer, pl_module):
        checkpoint_path = f"{self.result_path}/{self.epoch}"
        os.makedirs(checkpoint_path, exist_ok=True)
        pl_module.processor.save_pretrained(checkpoint_path)
        pl_module.model.save_pretrained(checkpoint_path)
        print(f"Saved checkpoint to {checkpoint_path}")
        self.epoch += 1
    def on_train_end(self, trainer, pl_module):
        checkpoint_path = f"{self.result_path}/latest"
        os.makedirs(checkpoint_path, exist_ok=True)
        pl_module.processor.save_pretrained(checkpoint_path)
        pl_module.model.save_pretrained(checkpoint_path)
        print(f"Saved checkpoint to {checkpoint_path}")
Training Execution
The training process combines all previous components and leverages GPU acceleration, applies gradient accumulation, performs validation checks, saves checkpoints, and monitors progress.
trainer = L.Trainer(
    accelerator="gpu",
    devices=[0],
    max_epochs=config.get("max_epochs"),
    accumulate_grad_batches=config.get("accumulate_grad_batches"),
    check_val_every_n_epoch=config.get("check_val_every_n_epoch"),
    gradient_clip_val=config.get("gradient_clip_val"),
    limit_val_batches=1,
    num_sanity_val_steps=0,
    log_every_n_steps=10,
    callbacks=[SaveCheckpoint(result_path=config["result_path"]), early_stopping_callback],
)
trainer.fit(model_module)
Inferencing the fine-tuned Qwen2.5 VL model:
This inference pipeline provides a streamlined approach to utilizing the fine-tuned model. If you plan to expose this with a web UI, here’s a quick comparison of modern front-end frameworks: Angular vs React vs Vue. In real-world scenarios where models are applied to invoices, shipping docs, or scanned text, an ocr models comparison can provide useful context on baseline performance and trade-offs between approaches.
model = Qwen2_5_VLForConditionalGeneration.from_pretrained(
    "Qwen/Qwen2.5-VL-3B-Instruct ",
    device_map="auto",
    torch_dtype=torch.bfloat16
)
processor = Qwen2_5_VLProcessor.from_pretrained(
    "Qwen/Qwen2.5-VL-3B-Instruct ",
    min_pixels=MIN_PIXELS,
    max_pixels=MAX_PIXELS
)
ft_model = Qwen2_5_VLForConditionalGeneration.from_pretrained(
    "/path/to/your/model/qwen2.5-3b-instruct-ft/latest",
    device_map="auto",
    torch_dtype=torch.bfloat16
)
ft_processor = Qwen2_5_VLProcessor.from_pretrained(
    "/path/to/your/model/qwen2.5-3b-instruct-ft/latest",
    min_pixels=MIN_PIXELS,
    max_pixels=MAX_PIXELS
)

def run_inference(model, processor, conversation, max_new_tokens=1024, device="cuda"):
    text = processor.apply_chat_template(conversation, tokenize=False, add_generation_prompt=True)
    image_inputs, _ = process_vision_info(conversation)
    inputs = processor(
        text=[text],
        images=image_inputs,
        return_tensors="pt",
    )
    inputs = inputs.to(device)
    generated_ids = model.generate(**inputs, max_new_tokens=max_new_tokens)
    generated_ids_trimmed = [
        out_ids[len(in_ids):]
        for in_ids, out_ids
        in zip(inputs.input_ids, generated_ids)
    ]
    output_text = processor.batch_decode(
        generated_ids_trimmed,
        skip_special_tokens=True,
        clean_up_tokenization_spaces=False
    )
    return output_text[0]

image_path = path/to/your/image

conversation=[
        {
            "role": "user",
            "content": [
                {"type": "image", "image": image_path, "resized_height": 1080, "resized_width": 480},
                {"type": "text", "text": text_input},
            ],
        }
    ]

output = run_inference(model, processor, conversation)
ft_output= run_inference(ft_model, ft_processor, conversation)
print(output)
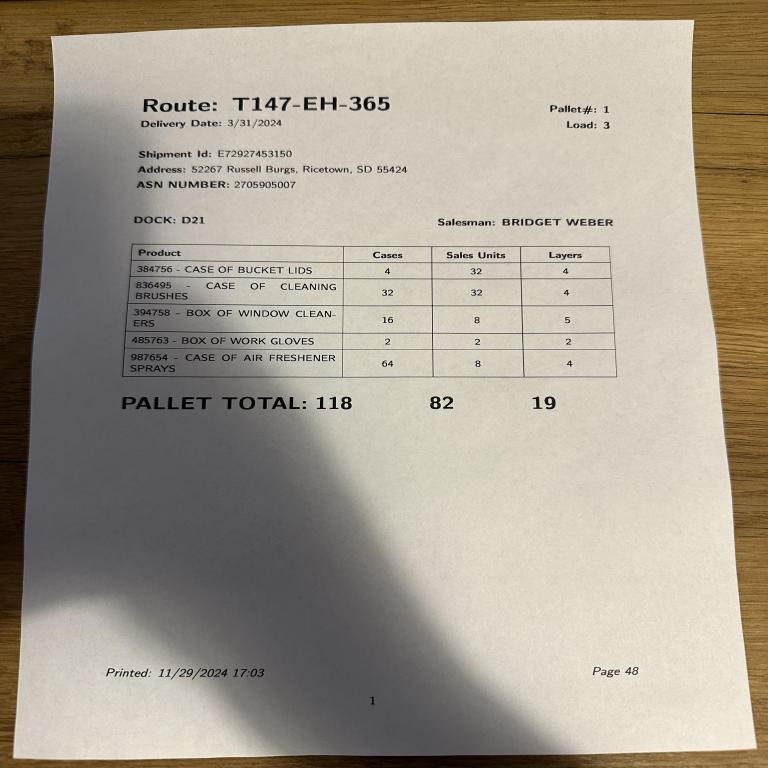
Input image
Output
Original model output
 "route": {
    "id": "T147-EH-365",
    "delivery_date": "3/31/2024"
  },
  "shipment_id": "E72927453150",
  "address": {
    "city": "Ricetown",
    "state": "SD",
    "zip": "55424"
  },
  "asn_number": "2705905007",
  "dock": "D21",
  "salesman": "BRIDGET WEBER",
  "products": [
    {
      "product_id": "384756",
      "name": "CASE OF BUCKET LIDS",
      "cases": 4,
      "units": 32,
      "layers": 4
    },
    {
      "product_id": "836495",
      "name": "CASE OF CLEANING BRUSHES",
      "cases": 32,
      "units": 32,
      "layers": 4
    },
    {
      "product_id": "394758",
      "name": "BOX OF WINDOW CLEANERS",
      "cases": 16,
      "units": 8,
      "layers": 5
    },
    {
      "product_id": "485763",
      "name": "BOX OF WORK GLOVES",
      "cases": 2,
      "units": 2,
      "layers": 2
    },
    {
      "product_id": "987654",
      "name": "CASE OF AIR FRESHENER SPRAYS",
      "cases": 64,
      "units": 8,
      "layers": 4
    }
  ],
  "pallet_total": {
    "cases": 118,
    "units": 82,
    "layers": 19
  },
  "printed_date": "11/29/2024 17:03",
  "page_number": 48
}
```
Fine-tuned model output
{
  "pallet_number": "1",
  "load": "3",
  "route": "T147-EH-365",
  "delivery_date": "3/31/2024",
  "shipment_id": "E72927453150",
  "dock": "D21",
  "destination": "52267 Russell Burgs, Ricetown, SD 55424",
  "asn_number": "2705905007",
  "salesman": "BRIDGET WEBER",
  "products": [
    {
      "description": "384756 - CASE OF BUCKET LIDS",
      "cases": "4",
      "sales_units": "32",
      "layers": "4"
    },
    {
      "description": "836495 - CASE OF CLEANING BRUSHES",
      "cases": "32",
      "sales_units": "32",
      "layers": "4"
    },
    {
      "description": "394758 - BOX OF WINDOW CLEANERS",
      "cases": "16",
      "sales_units": "8",
      "layers": "5"
    },
    {
      "description": "485763 - BOX OF WORK GLOVES",
      "cases": "2",
      "sales_units": "2",
      "layers": "2"
    },
    {
      "description": "987654 - CASE OF AIR FRESHENER SPRAYS",
      "cases": "64",
      "sales_units": "8",
      "layers": "4"
    }
  ],
  "total_cases": "118",
  "total_units": "82",
  "total_layers": "19",
  "printed_date": "11/29/2024 17:03",
  "page_number": "48"
}
The difference is subtle at first glance, but critical in production. The base model extracts some fields correctly, but misses structural intent. After fine-tuning, the model consistently adheres to the expected schema, preserves field naming, and avoids inventing nested structures.
Walk away with actionable insights on AI adoption.
Limited seats available!
Our Final Words
Fine-tuning Qwen2.5 VL is less about writing perfect training code and more about managing small, compounding decisions, data structure, prompt framing, masking strategy, and evaluation signals. When these align, the model becomes reliable. When these factors are misaligned, increasing compute alone rarely fixes the problem.
By following this end-to-end process, covering environment setup, data preparation, model configuration, data processing, training architecture, checkpoint management, training execution, and inference, developers can systematically implement fine-tuning while avoiding common pitfalls. The inclusion of practical best practices and detailed explanations for each implementation choice makes this guide accessible for teams looking to adopt the Qwen2.5 VL model for their specific needs, regardless of their prior experience with model fine-tuning.

Walk away with actionable insights on AI adoption.
Limited seats available!