

Large Language Models (LLMs) have revolutionized the field of natural language processing. While these models are powerful, creating an effective UI for LLM is crucial for user interaction. This is where Gradio UI comes into play, offering an elegant solution for building interfaces.
Importance of User Interfaces for LLMs
While LLMs are incredibly powerful, their complexity can make them challenging for non-technical users to interact with. This is where user interfaces become crucial. A well-designed UI serves several important purposes:
1. Accessibility: It makes the power of LLMs available to users who may not have programming experience.
2. Ease of use: A good interface simplifies the interaction process, allowing users to focus on their tasks rather than the technicalities of the model.
3. Rapid prototyping: For developers and researchers, a quick UI can help in testing and iterating ideas faster.
4. Demonstration: UIs provide an effective way to showcase the capabilities of LLMs to stakeholders or potential users. For instance, check out our AI POC collection where we've built intuitive interfaces for healthcare, finance, and legal document processing systems.
What is Gradio
Gradio is a Python library designed to simplify the process of creating web-based user interfaces for machine learning models. It offers several advantages:
1. Simplicity: With just a few lines of code, you can create a functional Gradio interface for your LLM.
2. Flexibility: Gradio supports various input and output types, making it suitable for different kinds of LLM applications.
3. Customization: While simple to use, Gradio also offers options for more advanced customization of the UI.
4. Sharing: Gradio makes it easy to share your LLM demo with others, either by generating a public link or by embedding it in a webpage.
In this blog, we will explore how to use Gradio to create a simple yet effective UI for an LLM.
A Step-by-Step Guide to Creating a UI for LLM using Gradio
A. Installing Gradio
Before we begin, make sure you should have Python installed on our system. Download the latest version from the official Python website. Once installed, open the terminal or command prompt and run the following command to install Gradio.
pip install gradioB. Importing Gradio and other required libraries
Create a new Python file (eg: demo.py) and import the necessary libraries
import gradio as gr
import torch
from transformers import pipeline
Here, we’re importing:
- “Gradio” for creating the interactive demo
- “torch” for working with PyTorch models
- “transformers” for loading pre-trained LLMs and tokenizers
Partner with Us for Success
Experience seamless collaboration and exceptional results.
C. Defining the LLM function
Next, define a function that takes in a user input and generates a response using the LLM. For this example, we’ll use the Hugging Face ‘google/gemma-2-2b’ model
def llm_generate(input):
pipe = pipeline(
      "text-generation",
       model="google/gemma-2-2b",
       device="cuda",
	)
	outputs = pipe(input, max_new_tokens=256)
	response = outputs[0]["generated_text"]
	return response
D. Creating a Gradio interface
Now create a Gradio interface to interact with the LLM function:
demo = gr.Interface(
    fn=llm_generate,
    inputs=gr.Text(),
    outputs=gr.Text(),
    title="Large Language Model Demo",
    description="Enter a sentence or paragraph to generate a response",
)
Here, we’re creating a Gradio interface with:
- ‘fn’: the LLM function we defined earlier
- ‘inputs’: a text input field for the user to enter their prompt
- ‘outputs’: a text field to display the generated output
- ‘title’ and ‘description’: Customizing the interface with a title and description
E. Launching the demo
Finally, launch the demo by running the following command:
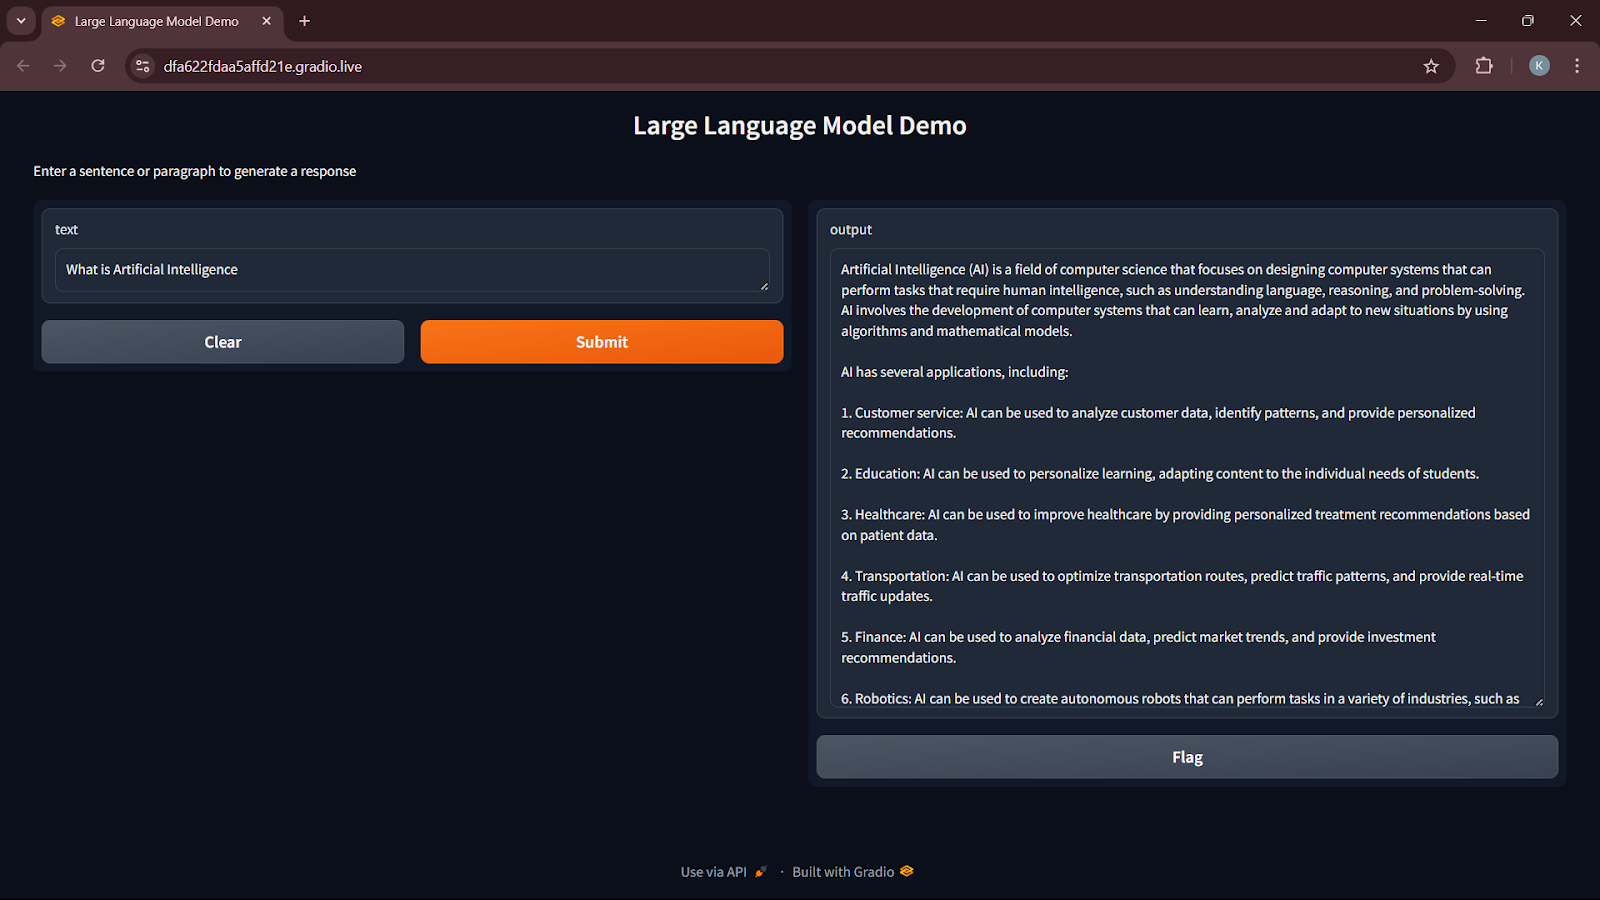
demo.launch()This will start a local web server, and we can access the demo by navigating to ‘http://localhost:7860’ in our web browser.
If you'd like to share your app with others, simply include `share=True` in the launch function. This will create a public link that you can share with anyone. The recipient can then open the link in their browser and try out the model directly.
demo.launch(share=True)A shareable link typically appears like this: https://07ff8706ab.gradio.live.
SCREENSHOT :
Customization Options
A. Modifying Input and Output Types
The Gradio supports a variety of input and output formats, including text, images, audio and more. We can modify the input and output formats to match the specific requirements of our LLM demo.
Input Types
There are many input formats available. Now let’s discuss only a few types of input
- ‘text’: a text input field
- ‘image’: an image upload field
- ‘audio’: an audio upload field
- ‘video’: a video upload field
- ‘number’: a numeric input field
- ‘select’: a dropdown select input field
Output Types
- ‘text’: a text output field
- ‘image’: an image output field
- ‘audio’: an audio output field
- ‘html’: an HTML output field
- ‘JSON’: a JSON output field
To modify the input and output formats, simply update the ‘inputs’ and ‘outputs’ parameters in our Gradio interface.
B. Adjusting the UI Layout
The Gradio provides several options for customizing the UI layout of our demo. We can adjust the layout to better suit our needs and make our demo more user-friendly.
Layout Options
- vertical: a vertical layout with input fields and output fields stacked on top of each other
- horizontal: a horizontal layout with input fields and output fields side by side
- tabbed: a tabbed layout with input fields and output fields organized into separate tabs
C. Adding Additional Features
Gradio provides several additional features that we can use to enhance our demo, including examples, flags, and more.
Partner with Us for Success
Experience seamless collaboration and exceptional results.
Examples
Gradio examples are predefined inputs that users can quickly select to see how the model or function responds. These examples are usually displayed as buttons, and when clicked, they automatically populate the input fields, making it easier to demonstrate the capabilities of the app.
demo = gr.Interface(
    fn=llm_generate,
    inputs=gr.Text(),
    outputs=gr.Text(),
    title="Large Language Model Demo",
    examples=["What is AI","What is ML"]
    description="Enter a sentence or paragraph to generate a response",
)
Suggested Reads- How To Use Open Source LLMs
Benefits of using Gradio
A. Rapid Prototyping
Gradio enables rapid prototyping, allowing us to quickly test and validate our ideas without investing a lot of time and resources. With Gradio, we can create a demo in just a few lines of code, making it an ideal tool for researchers and developers.
- Faster iteration: Rapid prototyping enables us to quickly test and refine our ideas, reducing the time and effort required to develop a working prototype.
- Improved collaboration: Gradio demos can be easily shared with colleagues and stakeholders, facilitating collaboration and feedback.
- Reduced costs: By prototyping quickly, we can avoid investing in expensive infrastructure or development costs.
B. Easy Sharing and Deployment
The Gradio makes it easy to share and deploy our demos, allowing us to showcase our work to a wider audience. With Gradio, we can deploy our demo to a variety of platforms, including web servers, cloud services, and even mobile devices.
- Broader Reach: Gradio demos can be easily shared with anyone, regardless of their technical expertise, making it easier to showcase our work to a wider audience.
- Increased Adoption: By making it easy to deploy and share demos, Gradio encourages the adoption of AI models and technologies.
C. Versatility for Different AI Models
Gradio is designed to work with a wide range of AI models, including LLMs, computer vision models etc. This versatility makes Gradio an ideal tool for developers and researchers working with AI models, regardless of their specific application or domain.
- Flexibility: Gradio's versatility enables us to work with a wide range of AI models, making it easier to experiment with new ideas and applications.
- Interoperability: Gradio demos can be easily integrated with other tools and platforms, facilitating collaboration and innovation.
- Future Spoofing: By supporting a wide range of AI models, Gradio ensures that our demos remain relevant and effective, even when new models and technologies emerge.
Conclusion
In this blog, we have explored the process of creating a Gradio demo for an LLM and customizing it to suit our needs. We started by installing Gradio and created a basic demo for an LLM. We explored various customization options, including modifying input and output formats, adjusting the UI layout and adding additional features. We also discussed the advantages of using Gradio, including rapid prototyping, easy sharing and deployment, and versatility for different AI models.
As LLMs continue to evolve, we can expect to see new and innovative interfaces emerge. Some potential future possibilities include
- Multimodal interfaces
- Conversational interfaces
- Explainable AI interfaces
Frequently Asked Questions
1. What type of input can I use with Gradio for my LLM interface?
The Gradio supports various input types including text, image, audio, video, and more. You can choose the appropriate input type based on your LLM's capabilities and your application needs.
2. How can I customize the layout of my Gradio LLM interface?
The Gradio offers layout options like vertical, horizontal, and tabbed. You can adjust these in the Interface creation to better suit your demo's needs and improve user experience.
3. Can I add example inputs to my Gradio LLM demo?
Yes, you can add predefined examples to your Gradio interface. This feature helps users quickly test your LLM's capabilities and understand how to interact with it.


Kiruthika
I'm an AI/ML engineer passionate about developing cutting-edge solutions. I specialize in machine learning techniques to solve complex problems and drive innovation through data-driven insights.


