
What is Smoke Testing? : A Beginner's Guide

Testing is not a final step before deployment; it is a structural safeguard that protects software quality from the first build onward.
I’m writing this guide for developers, QA engineers, and product teams who want clarity on how smoke testing protects build stability before deeper testing begins.
Smoke testing is a foundational verification step performed on every new build to confirm that core functionalities are stable enough to proceed with regression, functional, or performance testing.
This guide explains what smoke testing is, why it matters, when it should be performed, and the exact steps required to execute it effectively, why it is important, when to do it, and the steps to perform.
What is Smoke Testing?
Smoke Testing, or Build Verification Testing, is a type of initial testing which asserts the basic functionality of an application. Smoke testing is used for validating the stability of critical features before proceeding with detailed testing. The aim is to ensure that the most essential features are functioning properly and the build is stable enough to proceed with more extensive, detailed testing.
Why is Smoke Testing Important?
Early Detection of Critical Defects: Smoke testing identifies major functional failures immediately after build deployment, preventing unstable builds from progressing into deeper testing cycles.
Prevents Wasted Testing Effort: It stops QA teams from investing time in builds that are fundamentally broken.
Improves Overall Build Stability: Early correction of critical defects strengthens release confidence and reduces downstream risk.
When is Smoke Testing Performed?
Smoke testing is performed immediately after a new build is deployed to the testing environment. It acts as a gatekeeper before regression, integration, or system-level testing begins and is deployed in the testing environment. It can be done at any of the stages, such as:
- After New Features or Fixes: Smoke testing checks if the build is stable and if the developers integrate a few of the new features or fixes.
- Before Regression Testing: Smoke tests are generally executed prior to running extensive regression tests, in order to verify any and all critical functionalities of the build are intact.
Suggested Reads- Implementing Quality Assurance in a CI/CD Pipeline
Key Steps in Smoke Testing

Identify Critical Test Cases: Select high-impact workflows such as login, core navigation, and essential transactions. These must represent system stability, not edge cases.
Sleep Easy Before Launch
We'll stress-test your app so users don't have to.
Prepare the Testing Environment: Ensure configuration mirrors production conditions closely enough to validate build stability.
Execute Smoke Tests: Run the selected tests, focusing strictly on core functionality.
Evaluate Stability: Determine whether the build can proceed or must be rejected.
Report and Escalate Failures: Document critical defects and return the build to development if instability is found.
Smoke Testing Example
For example, in an e-commerce application, smoke testing would validate the most business-critical workflows before further testing proceeds. So what does a smoke test look like for this site?
- Home Page Load: Check that we can load the home page without error.
- Login Functionality: Users should be able to log in and out.
- Product Search: Verify whether users are able to search for the products.
- Add to Cart: Test if items can be added to the cart.
- Checkout Steps: Ensure that the users are able to go through the checkout process.
Tools for Smoke Testing
Smoke testing can be executed manually, but automation significantly improves consistency and speed, especially in CI/CD pipelines and make it an automated one. Here are a few that we see most often:
- Selenium: An open-source automation tool extensively used for web applications to automate the smoke tests of fundamental features.
- Jenkins: A continuous integration tool that itself can schedule smoke tests, as a part of the build process essentially validating if initial flows are stable.
- JUnit/TestNG: Automation frameworks for smoke tests for Java applications, associated with unit and integration testing.
- Postman: Good for running smoke tests on APIs by automating important API endpoints (validates if the basic functionality of the back-end parts is working)
- Apache JMeter: It is best suited for performance and load testing but it can also run automated smoke tests—most simply for API or service level validations.
These tools let you automate smoke testing to ensure faster feedback and quicker detection of issues.
Suggested Reads- Top 10 Automation Testing Tools
Smoke Testing Results
Smoke testing produces a clear binary outcome that determines whether further testing should continue.
- Pass: There are certain critical functions, if all of them pass the build is considered stable and can be subjected to further tests like regression or functional test.
- Fail: A single critical function has failed, making the build unstable. If the result is not successful then there will be no more testing and the problems are sent back to development.
Sleep Easy Before Launch
We'll stress-test your app so users don't have to.
This allows the team to quickly determine if they want to move forward with running further testing stages or whether important issues need to be rectified in the build.
Diagram: Smoke Testing Process
Now, to depict the flow of executing smoke testing, Here is an ultimate simple flow diagram.
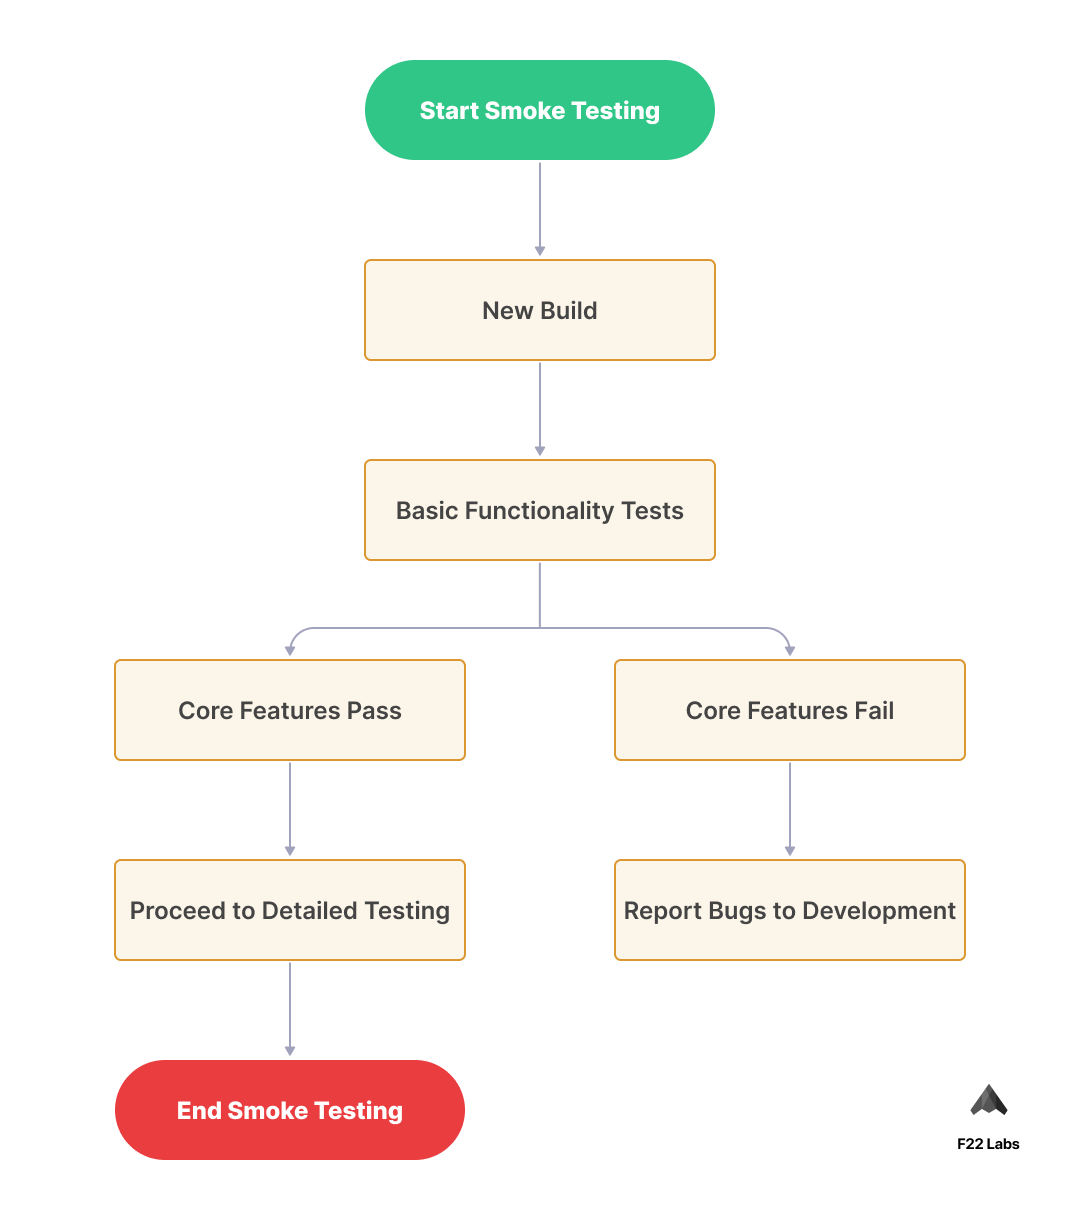
As illustrated in the diagram, it details how a smoke testing process flows ranging from starting a new build through to either moving prior to detailed testing (if all core functionality passes) and the bug reports back into development if key features do not pass.
Conclusion
Smoke testing plays a critical role in maintaining build integrity and preventing unstable releases from progressing further in the testing lifecycle.
By validating only essential functionality, teams preserve time, reduce risk, and protect development velocity.
When implemented consistently, whether manually or through automation, smoke testing becomes a reliable checkpoint that strengthens overall software quality, where major problems can be detected early, thereby assisting in maintaining the stability of the build. Focusing on Essential Functionality, Performing a Smoking Test, in a Manual/Automated Way, can Help Teams Save Time and Avoid Costly Mistakes While Ensuring Deliverable Software.
I hope this guide serves you well as a primer for smoke testing and how to effectively use it. Now, with frequent smoke tests, you are halfway towards good quality software.
Frequently Asked Questions?
What is the main difference between smoke testing and regression testing?
Smoke testing verifies the basic functionality of a new build, while regression testing comprehensively checks if new changes affect existing features.
How long should a smoke test take?
Smoke tests should be quick, typically taking 15-30 minutes, focusing only on critical functionalities to determine build stability.
Can smoke testing be done manually, or should it be automated?
Both approaches work - manual testing is good for initial exploration, while automation is ideal for frequent builds and continuous integration.

Binju K O
I’m a dedicated QA professional with 5 years of experience, passionate about delivering flawless software and sharing valuable insights to inspire and empower others in the tech world


