Streaming Videos With AWS Elastic Transcoder My Story!
This is my version of how to stream videos with AWS at minimal cost and decent security for the content. We at F22 Labs recently finished a client project, which is an on-demand video service.
We wanted to ensure the following :
- That the content is not scrapable/downloadable by extracting the video URL.
- Enable Dynamic bit rate play, so that the streaming bit rate would automatically toggle based on the internet connection strength.
Before we dive in, here’s some context. This is my first time directly playing with the AWS console. I have written several iOS components that use AWS APIs, but this is my first time setting up an entire AWS service from scratch for a project. Being a developer who has only worked in iOS and other frontend technologies, I really felt like a monkey who has got a diamond in his hand! I struggled hard, luckily my team and our client were encouraging — lucky me!

Here’s the basic version of how not to set up video streaming :
Store the videos in 2 S3 Buckets. One will store the original .mp4 videos and the other stores the output files which can be streamed. Bear with me here, I will explain what the output files are and how to generate them in a bit.
When you put a .mp4 video directly to S3 and use the S3 URL to stream the video, you will be disappointed. The trial iOS app I built to test this started downloading the entire video in one shot it took about a minute to download the 2 min video file and started playing it. This is not the expected behavior we wanted. But this was good to know! Then what is the solution for this?
This failed because :
- It did not stream, but instead downloaded the entire file in one shot.
- Was not secure, as anyone that sniffs the traffic can get the .mp4 URLs and can download them.
Here comes the savior: HTTP Live Streaming — HLS
This is an amazing protocol for VOD (Video On Demand).
Here’s what HLS does :

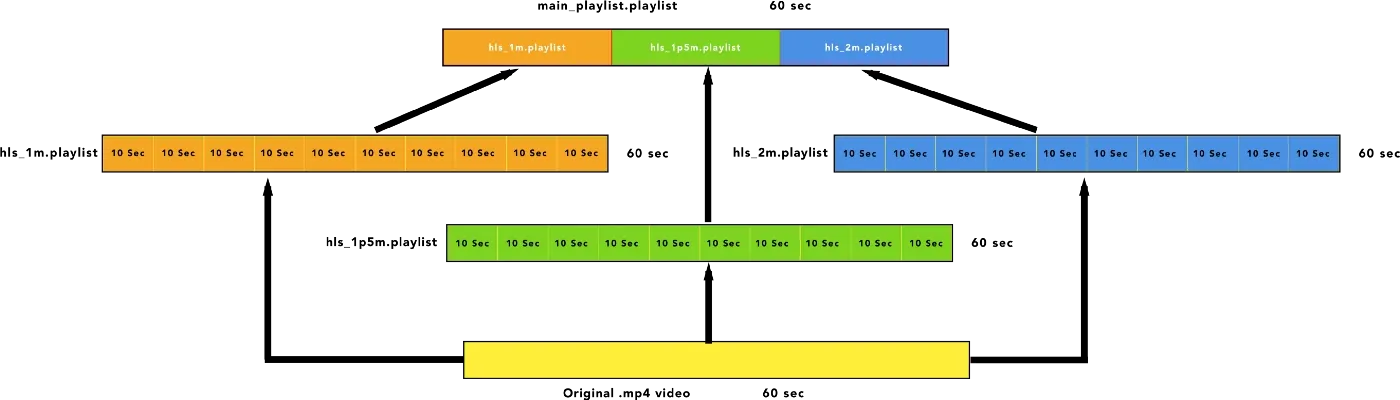
- It allows you to breakdown your video into smaller segments (of say 10 seconds). A segment is the smallest length of video that would be played without buffering.
- Multiple copies of the segmented video are created with different bitrates to allow for download based on the internet speed of the consumer.
- A playlist is a compilation of the different smaller segments. There is one playlist per bitrate. Example: We will have 1 playlist for 1080p, 1 for 360p and so on. These playlists are .m3u8 files.
- Then there is another grand .m3u8 (playlist) file, that contains all the other .m3u8 files. This is how the player toggles between different bitrate video segments based on internet strength.
Build, Scale, and Optimize on AWS
We design, build, and manage scalable cloud solutions on AWS, secure, cost-efficient, and ready to grow with your business.
AWS Media Convert
Using AWS Media Convert, you can create multiple playlists with different bit rates. But you need to write additional code to create the containing .m3u8 file that references the individual bitrate .m3u8 files.
And this allows to stream the video at dynamic bitrates depending on the strength of the internet connection, but it’s not secure. On video play, if we sniff the requests to get the video URL, using the URL, the video can be downloaded.
There is a way, however, to enable Digital Rights Management (DRM) while making the output files from the Media Convert. AWS provides us with the option to enable this feature but requires 3rd party services to encrypt the videos. We were looking for a way to achieve our requirements completely through AWS, and that’s when we tried our next service.
Elastic Transcoder
Here’s how we achieved both our requirements with Elastic Transcoder :
Step 1: Login to AWS console and from the services menu select S3.
Step 2: In S3 create 3 buckets with the preferred region. 1) Input bucket, 2) Output bucket & 3) Image thumbnail bucket.
Step 3: Upload the video you need to convert into Input bucket.
Step 4: From the services menu select Elastic Transcoder.
Step 5: Click on Create New Pipeline button. You only need to do this one time.
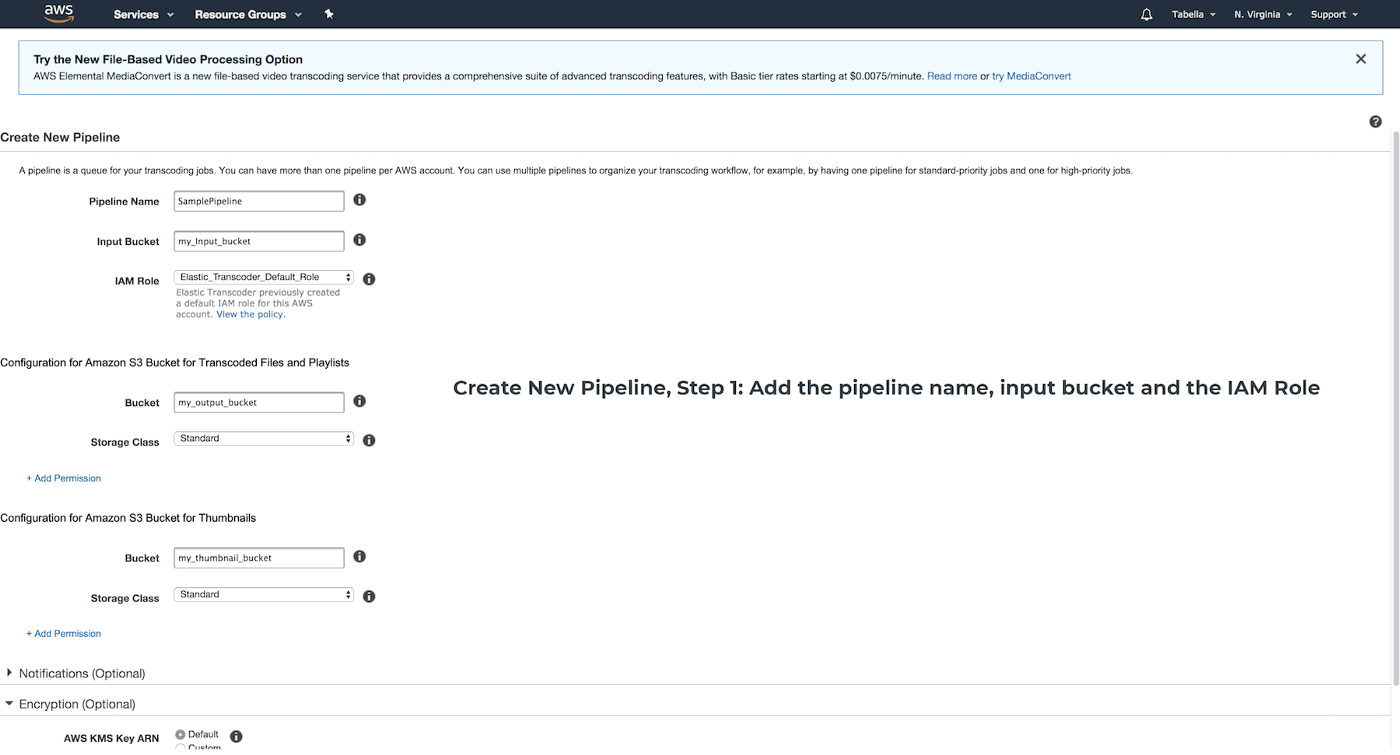
Step 6: Fill the form!
Pipeline name: This must be unique to your account
Input Bucket: Select the Input bucket you created before
IAM Role: Select the Elastic_Transcoder_Default_Role. This is the default role AWS created for you while you created your account in AWS. If you prefer to use other IAM roles feel free to select them
Configuration for Amazon S3 Bucket for Transcoded Files and Playlists
Bucket: This is the Output bucket where the converted videos will be stored. Select your Output bucket.
Storage Class: Select the value “Standard” from the dropdown
Configuration for Amazon S3 Bucket for Thumbnails
Bucket: This is where the Thumbnail images generated by the Elastic Transcoder is stored. Select the Image thumbnail bucket you created earlier.
Storage Class: Select the value “Standard” from the dropdown
In the Notifications section, I prefer to set everything to “No Notifications”
Encryption
AWS KMS Key ARN: Select the custom radio button. Doing this will create a new text box.
ARN Key: Here you will have to enter your ARN Key. I will explain how to create your ARN key in the next section.
Step 7: Click the “Create Pipeline” button. You will have wait until the new pipeline you created to change its status to Active.
Step 8: Once The pipeline is active, click on the “Create New Job” button. To create a new job. For every video, you have to convert you will have to create a new job.
Step 9: Fill the new form!
Pipeline: Select your pipeline from the dropdown.
Output Key Prefix: Here you will have to select the path where the output video should be saved in the Output bucket of your pipeline. AWS will automatically show you some suggestions as you type.
Input Details
Input Key: Here select the video file you want to convert. AWS will automatically list all the contents of the Input bucket for you.
Decryption Parameters: Select the None radio button
Available Settings: Do not select any options here
Build, Scale, and Optimize on AWS
We design, build, and manage scalable cloud solutions on AWS, secure, cost-efficient, and ready to grow with your business.
Output Details
We will have to create multiple outputs based on the output requirements of our application. For our case, we will need 2M, 1.5M and 1M presets that are already there. So we will be creating 3 outputs using the “Add Another Output” option at the bottom of this section in AWS.
Preset: From the dropdown select the preset that you need for first output select “System Preset: HLS 2M” for second output select “System Preset: HLS 1.5M” and for third output select “System Preset: 1M”.
Segment Duration: This is the duration of each “.ts” segment file that will be created. I set this value to 10 meaning 10 seconds.
Output Key: Enter name for the output file, this will be prefix added to each .ts file and the playlist the ts files are part of. Make sure this is unique for every output in this job.
Do not change any other values in this section.
Suggested Reads- How to Analyse Documents Using AWS Services
Playlists
In this section click on the “Add Playlist” button. The view will change to show some more contents now. Fill these contents as follows:
Master playlist Name: The name of the playlist. Make this unique, trust me you will not regret this!
Playlist Format: From the dropdown select the format “HLSv3”
Outputs in Master Playlist: from the dropdown select an output you created before. After this click on the “+” button next to the dropdown, this will create a new dropdown with the same title, from this select the next output. Likewise, repeat the process to select all the 3 outputs we have created.
Content protection: Select the HLS AES, then from the new dropdown pick “With Variant Playlists”. Make sure that the checkbox for “Autogenerate encryption key” is selected.
Step 10: Last step click on the “Create New Job” button. Wait for some time for the job to complete. Once it is completed, got to the Output s3 bucket, and find the location where you have saved the converted video file.
From the multiple files that are here select the file with the name that you provided as the “Master Playlist Name”.playlist. Fetch the URL corresponding to this .playlist file. Make the necessary changes to convert this content to be distributed from CloudFront. That's it!
This time all the .ts files are secured, even if someone manages to download the .ts files, the files will not play! But…
This is Not Enough…
If any person who has the URL for the .playlist file can download the video from any video download manager 😅
Our solution for this problem is to use URL signing offered by CloudFront. Once you enable this the video you are streaming will be secured.