
Flutter CI/CD Workflow: A Simple Guide Using App Centre

Mobile app releases break more often because of process gaps than code issues. CI/CD helps eliminate that unpredictability. For Flutter teams shipping to both Android and iOS, having a structured build and distribution pipeline is no longer optional, it directly impacts release speed, stability, and team confidence.
I’m writing this guide to simplify how you can implement CI/CD for Flutter using App Center without adding unnecessary complexity. From code commit to production-ready builds, this walkthrough focuses on creating a dependable, repeatable delivery workflow.
What is CI/CD?
CI/CD is a software development practice that automates code integration, testing, and deployment to ensure reliable and repeatable releases.
Continuous Integration (CI): CI is a process where developers frequently merge code into a shared repository, and automated checks validate builds and detect issues early.
Continuous Delivery/Deployment (CD): CD is a process that automatically builds, tests, and prepares applications for release, ensuring code changes move to production in a controlled and predictable way.
Benefits of CI/CD:
CI/CD improves release reliability, reduces deployment risk, and shortens development cycles through automation and structured validation.
Accelerated Delivery:
Automated builds and tests reduce manual effort and enable faster, predictable releases.
Early Detection of Issues:
Pull requests are automatically validated for build errors, dependency conflicts, and quality violations before reaching production.
More Stable Production Setup:
Consistent deployment pipelines reduce configuration drift between development, staging, and production environments.
Enhanced Collaboration:
Frequent integrations minimize merge conflicts and improve transparency across teams.
Iterative Development:
Smaller, controlled releases allow faster feedback and safer experimentation.
CI/CD for Flutter Applications
In the following sections, we'll explore implementing CI/CD pipelines for Flutter applications using App Center. We'll delve into best practices, practical tips, and real-world examples to help you master CI/CD for your Flutter projects.
What is Flutter?
Flutter is an open-source UI framework developed by Google for building natively compiled applications across mobile, web, and desktop from a single codebase. Released in 2018, it enables high-performance cross-platform development by compiling directly to native machine code and rendering UI through its own engine.
Key Features of Flutter
- Performance You Can Trust: Flutter app are compiled directly to native machine code, ensuring exceptional performance, smooth animations, and a seamless user experience across different devices and platforms.
- Expressive UI at Your Fingertips: Flutter boasts a rich collection of customizable UI components, widgets, and layouts. This empowers you to design stunning and interactive user interfaces that adhere to each platform's design guidelines.
- Write Once, Deploy Everywhere: The beauty of Flutter lies in its ability to leverage a single codebase for deployment across various platforms (iOS, Android, Web, Desktop). This translates to reduced development time and minimized maintenance overhead.Witness the efficiency of Flutter with popular apps like Alibaba's Xianyu (e-commerce), Google Ads (mobile advertising), and The New York Times (news) reaching users on both mobile and web. Even desktops are benefiting from Flutter, with apps like Hamilton (the musical's companion app) and Stadia (Google's game streaming platform)
- Native Feature Integration: Flutter integrates seamlessly with platform-specific features and APIs. Access device hardware, sensors, and native functionalities via platform channels. This approach provides an indirect access layer, but it ensures smooth integration without compromising performance or user experience.
Interested in a more in-depth comparison? Check out our blog post: exploring Flutter vs React Native
What is App Center?
App Center is a cloud-based DevOps platform by Microsoft designed to automate mobile app build, test, distribution, and monitoring workflows. It centralizes CI/CD processes, enabling teams to configure build pipelines, manage releases, collect crash reports, and analyze app performance from a single dashboard.
Key Features of Microsoft App Center:
- Continuous Integration (CI): App Center’s CI service automates mobile app builds and validation across platforms and device configurations. It supports frameworks such as Xamarin, React Native, and Flutter, enabling structured CI pipelines for consistent build verification and early issue detection.
- Continuous Delivery (CD): App Center’s CD service automates app release management by distributing builds to targeted audiences, tracking deployment status, and supporting structured release pipelines for controlled and reliable delivery.
- Automated Testing: App Center provides cloud-based testing services, including real device testing (App Center Test Cloud) and integrated crash reporting via the App Center SDK. These tools enable early issue detection and validation across multiple platforms and device configurations to improve app reliability.
- Analytics and Monitoring: App Center provides analytics and crash reporting tools to track user behavior, application performance, and stability metrics in real time. These insights support data-driven decisions and structured performance optimization.
Combining Flutter’s cross-platform architecture with App Center’s CI/CD capabilities creates a structured workflow for building, validating, and distributing mobile applications efficiently. This setup improves release consistency, reduces deployment risk, and supports scalable mobile development practices.
Setting Up App Center for Your Flutter Project
Flutter provides a unified development architecture, and App Center enables structured CI/CD automation. Configuring App Center for your Flutter project allows you to automate builds, manage testing workflows, and control application distribution across Android and iOS.
The following steps outline how to configure App Center for a Flutter project:
1: Create a New App in App Center
- Sign in to the App Center dashboard using your Microsoft account.
- Select “Add new app”, then provide the app name and choose the target platform (Android or iOS).
- Click “Create” to register the application in App Center.
You will use this app configuration in later steps to connect your repository and configure build settings.
2: Configuring Your Flutter Android Project in App Center
Step 1: Add a New App in App Center
Open the App Center dashboard and select “Add new app.”
Provide the following details:
- Platform Selection: Choose Android as the target platform. If managing iOS separately, create an additional app configuration for iOS.
- App Name: Enter a clear and descriptive name to distinguish this project within your App Center workspace.
- App Owner (Optional): Assign an owner to manage access permissions and maintain project accountability.
This step initializes your Android app configuration and prepares it for repository connection and build pipeline setup.

Step 2: Add the App Center Build Script (Android)
The appcenter-post-clone.sh script runs automatically after App Center clones your repository. It installs Flutter, prepares dependencies, and builds the Android artifact during the CI process.
Let’s Build Your Flutter App Together!
Work with our expert team to turn your app idea into a fast, stunning Flutter product.
To configure it:
- Navigate to your Flutter project’s Android app directory:
flutterApp/android/app - Create a new file named:
appcenter-post-clone.sh - Paste the required build commands into this script.
This script ensures the App Center build environment is correctly prepared for Flutter compilation.
Paste the following content into the script:
#!/usr/bin/env bash
#Place this script in project/android/app/
cd ..
# fail if any command fails
set -e
# debug log
set -x

cd ..
git clone -b stable https://github.com/flutter/flutter.git
export PATH=`pwd`/flutter/bin:$PATH

flutter channel stable
flutter doctor -v

echo "Installed flutter to `pwd`/flutter"

# build APK
flutter clean
flutter pub get
flutter build -v apk --release

# if you need to build bundle (AAB) in addition to your APK, uncomment the following line below and last line of this script.
#flutter build appbundle

# copy the APK where AppCenter can find it
mkdir -p android/app/build/outputs/apk/; mv build/app/outputs/apk/release/app-release.apk $_

# copy the AAB where AppCenter can find it
#mkdir -p android/app/build/outputs/bundle/; mv build/app/outputs/bundle/release/app.aab $_
appcenter-post-clone.sh
Step 3: Update the Android .gitignore File
Open the .gitignore file located in:android/.gitignore
Ensure the following entries are properly configured (uncomment if necessary) so that required Gradle wrapper files are included in version control:
gradlew
gradlew.bat
Keeping these files tracked ensures App Center can execute Gradle commands correctly during the CI build process.
The updated android/.gitignore file should resemble the following:
# gradle-wrapper.jar
/.gradle
/captures/
# /gradlew
# /gradlew.bat
/local.properties
GeneratedPluginRegistrant.java

# Remember to never publicly share your keystore.
# See https://flutter.dev/docs/deployment/android#reference-the-keystore-from-the-app
key.properties
**/*.keystore
**/*.jks
This configuration ensures required build files are tracked while sensitive signing credentials remain excluded.
Step 4: Committing and Pushing Changes
Add the newly created appcenter-post-clone.sh script and the updated .gitignore file to version control.
Commit the changes and push them to your remote repository (e.g., GitHub or GitLab) so App Center can access the updated configuration during the build process.
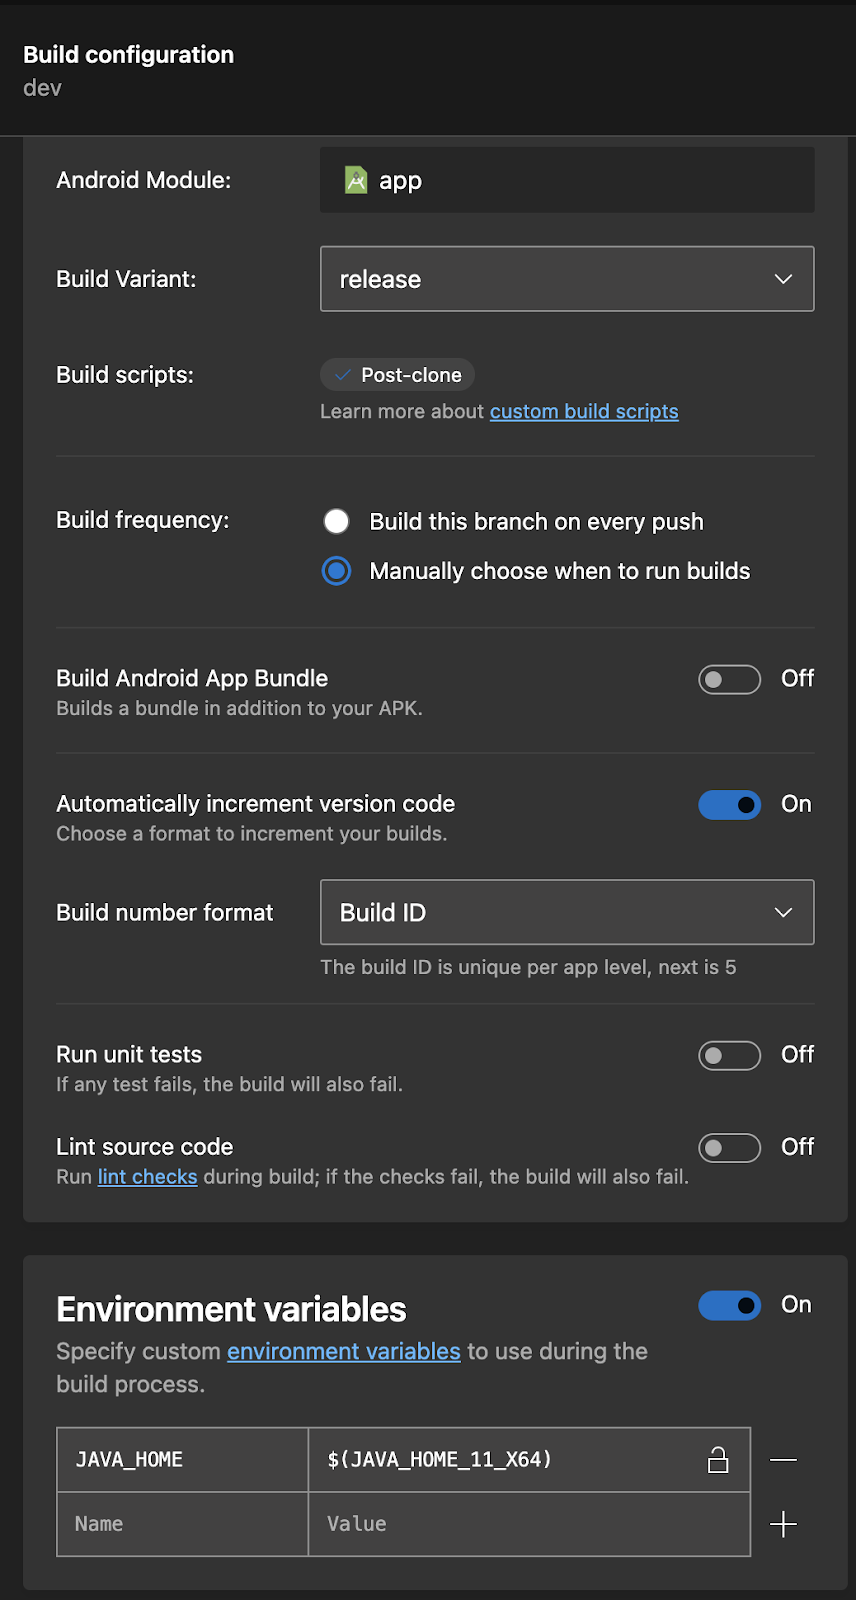
Step 5: Configuring Build in App Center
Open your app in the App Center dashboard and navigate to the Build tab.
- Connect your source control repository (e.g., GitHub).
- Select the repository and choose the branch containing your Flutter project.
- Open the build configuration settings.
If App Center does not detect the Android project, verify that Step 3 was completed and that the latest changes are pushed to the selected branch.
Under Environment Variables, add:
- Name:
JAVA_HOME - Value:
$(JAVA_HOME_11_X64)
In the Build Scripts section, confirm that appcenter-post-clone.sh is detected. This confirms the script integration is active.
Finally, select your build trigger preference:
- Automatic builds on every push
- Manual build triggers
Consider build time limits (free tier includes 4 build hours per month). Android and iOS builds typically take 5–10 minutes per run.

Step 6: Ensuring App Signing for Android
In the App Center build configuration, upload a valid JKS keystore file for signing the release build.
Provide the required credentials:
- Keystore password
- Key alias
- Key password
If you have not generated a keystore file, create one using Android Studio’s key generation process before proceeding.
Proper signing ensures the release APK or AAB can be installed and distributed securely.
Step 7: Building and Distributing Your App
After completing the configuration:
- Click “Save & Build” to start the Android build process.
- Once the build succeeds, open the build details and select the latest generated artifact.
- Click “Distribute” to release the build to testers.
You can distribute the APK via Over-the-Air (OTA) delivery to registered collaborators or download the artifact directly.
While automatic builds can be enabled for every commit, using manual distribution helps control build usage and resource consumption. Trigger builds after meaningful changes to maintain efficiency and optimize CI runtime.
Here's a breakdown of the benefits of manual distribution in App Center:
- Reduced Build Time and Costs: Automatic builds for every commit can add up, especially for larger projects. Manual distribution allows you to control when builds are triggered, saving time.
- Focus on Meaningful Changes: By manually triggering builds, you ensure they occur after significant code changes, leading to more efficient testing and iteration cycles.
- Resource Optimization: Manual distribution helps avoid unnecessary builds and distribution cycles, minimizing resource consumption on App Center's servers.
(Optional) Running UI Tests on New Builds
App Center does not natively execute Flutter UI tests by default. To enable automated UI validation:
- Write UI tests using Flutter Driver (or integration testing frameworks supported by Flutter) to simulate user interactions.
- Extend the
appcenter-post-clone.shscript to execute the test suite during the build process and surface results within the CI workflow.
This approach integrates UI validation into your existing build pipeline, improving release confidence before distribution.
Build Failures and Notifications:
App Center automatically sends email notifications when a build fails.
You can configure additional notification channels, such as Slack, by integrating App Center with your workspace using webhooks or third-party workflow automation tools.
Timely failure alerts help maintain pipeline stability and reduce downtime between commits and fixes.
3: Setting up your Flutter IOS Project in App Center
After configuring the Android build pipeline, the next step is to set up App Center for the iOS environment. This involves connecting the repository, configuring build settings, and managing signing credentials required for iOS distribution.
The following steps outline the iOS configuration process.
Let’s Build Your Flutter App Together!
Work with our expert team to turn your app idea into a fast, stunning Flutter product.
Step 1: Add a New iOS App in App Center
Sign in to the App Center dashboard.
Select “Add new” → “Add new app.”
Provide the required details:
- App Name: Enter a clear and identifiable project name.
- Platform: Select iOS.
- Development Technology: Choose Swift/Objective-C (required for Flutter iOS builds in App Center).
Click “Add new app” to register the iOS project configuration.
Step 2: Connect the Repository
Open the iOS app in App Center and navigate to the Build tab.
Click “Connect” to link your source control repository (e.g., GitHub or GitLab).
Authenticate with your selected service and choose the repository and branch containing your Flutter project.
This connection enables App Center to trigger builds from your selected codebase.
Step 3: Add the App Center Build Script (iOS)
Create an appcenter-post-clone.sh script inside the iOS project directory:
flutterApp/ios/appcenter-post-clone.sh
This script prepares the Flutter environment during the CI process and ensures dependencies are installed before the iOS build runs.
After adding the required commands to the script, commit and push the file to your repository so App Center can execute it during the build.
#!/usr/bin/env bash
#Place this script inside project/ios/
# fail if any command fails
set -e
# debug log
set -x
cd ..
git clone -b stable https://github.com/flutter/flutter.git
export PATH=`pwd`/flutter/bin:$PATH
flutter channel stable
flutter doctor
echo "Installed flutter to `pwd`/flutter"
cd ./ios
flutter precache --ios
flutter pub get
appcenter-post-clone.sh
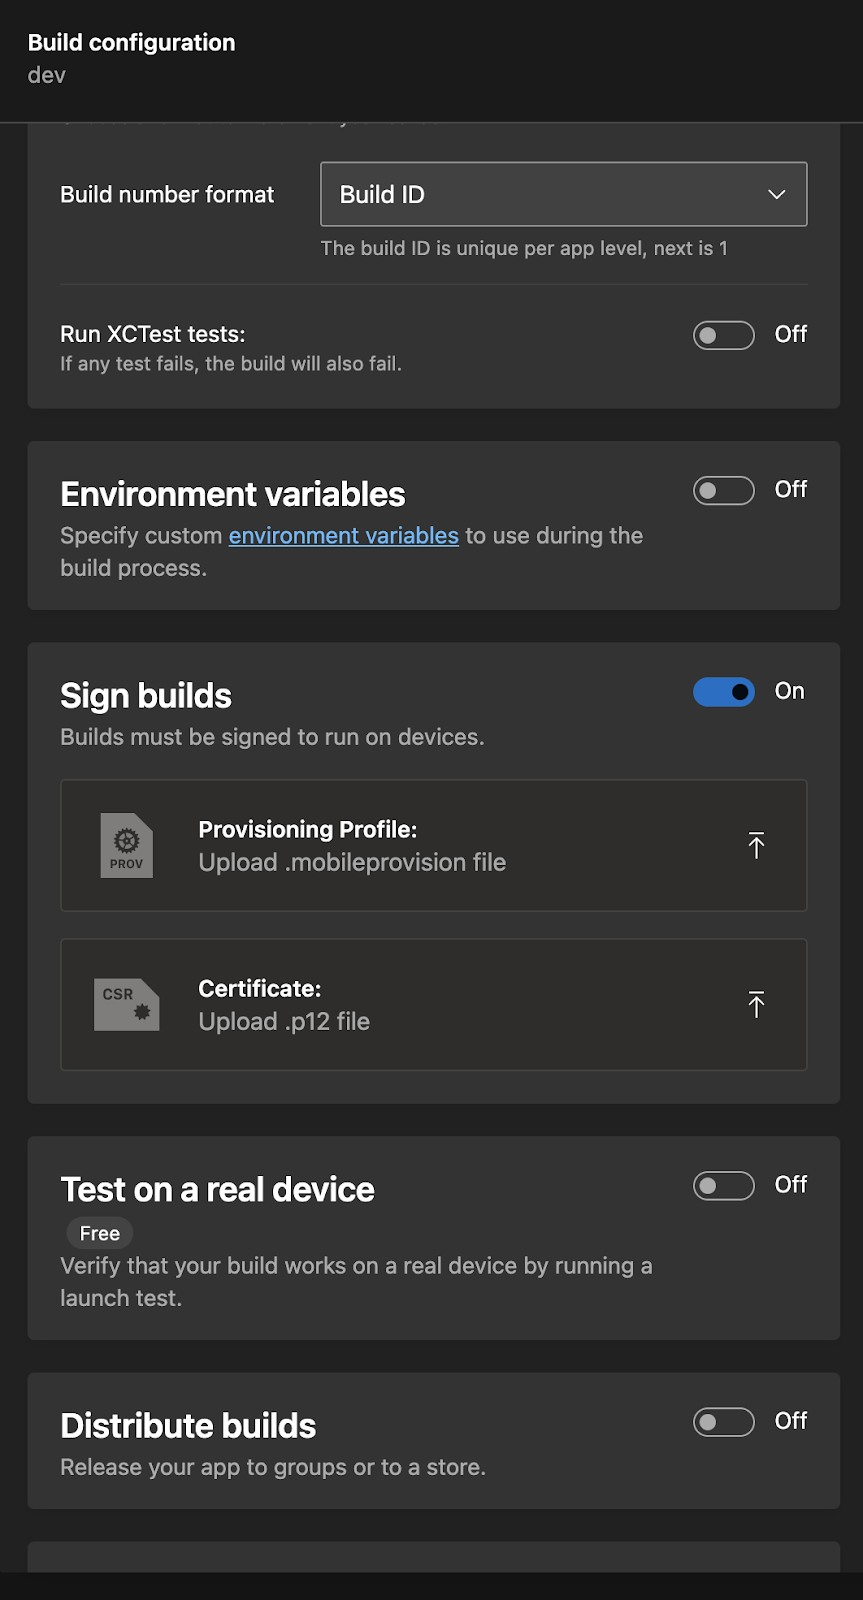
Step 4: Configuring Build Settings
Open the iOS app in App Center and navigate to the Build section.
If the iOS project appears under “Build app,” the repository integration is successful.
Enable the “Sign builds” option to allow App Center to generate a signed iOS build.
You will need to upload:
- Provisioning Profile (
.mobileprovision) - Signing Certificate (
.p12)
These files can be generated or downloaded from the Apple Developer Portal under Certificates, Identifiers & Profiles.
Proper signing configuration is required for installing the app on physical devices or distributing it through TestFlight or the App Store.
Step 5: Sign, Build and Distribute Your iOS App
Before building our iOS app, we need to make sure it's signed properly to run on a real device. Apps on iPhones and iPads, can only run if they have a digital signature created using Apple's code signing tools.
Requirements:
- Apple Developer Program membership (https://developer.apple.com/programs/)
Signing Process:
- Generate a Certificate Signing Request (CSR): (Two Options)
- Option 1 (Requires Xcode):
- Open Xcode and navigate to Product > Create Signing Request.
- Fill out the information and save the generated CSR file.
- Option 2 (Without Xcode):
- Open Keychain Access on your Mac.
- Go to "Keychain Access" > "Certificate Assistant" > "Request a Certificate from a Certificate Authority."
- Fill in the necessary details.
- Save the CSR file to your computer.
- Option 1 (Requires Xcode):
- Create a Certificate:
- Login to your Apple Developer account and go to Certificates, Identifiers & Profiles.
- Select Certificates > All > +.
- Choose the appropriate certificate type (e.g., iOS App Development, Push Notifications).
- Upload the CSR file (From Step 1).
- Follow prompts to complete certificate creation.
- Download and Install Certificate:
- Download the issued certificate from the Developer Portal.
- Double-click the certificate to install it in your Keychain Access.
- Create a Provisioning Profile
- In the Apple Developer Portal, navigate to Provisioning Profiles and create a new profile.
- Select the app ID and certificate you created earlier.
- Choose the devices or distribution method (App Store, Ad Hoc, etc.).
- Download the generated provisioning profile.
- Upload Signing Credentials
- Upload the .p12 certificate file to your App Center dashboard in the "Signing" section as mentioned in the previous steps
- Build and Distribute:
- Initiate the build process for your Flutter iOS app using your chosen service.
Step 6: Distributing Your App
After a successful build, use App Center’s Distribute feature to release the iOS build to the selected tester group or distribution channel.
With both Android and iOS pipelines configured, your Flutter project now operates under a structured CI/CD workflow. This setup enables automated builds, controlled releases, and consistent cross-platform delivery.
Conclusion
This guide covered how CI/CD improves release reliability and how Flutter integrates with App Center to automate builds and distribution across Android and iOS.
The Flutter ecosystem also supports alternative CI/CD solutions such as Codemagic, fastlane, and Xcode Cloud for iOS workflows. The appropriate choice depends on project scale, team structure, and release requirements.
While App Center provides structured automation, manual build and signing processes may be suitable for smaller projects or controlled release environments.
A well-configured CI/CD pipeline ensures consistent builds, controlled deployments, and reduced production risk in cross-platform Flutter development.

Taha
Flutter Dev @ F22 Labs, solving mobile app challenges with a cup of coffee and a passion for crafting elegant solutions. Let's build something amazing together!


